Sunday, June 24, 2012

Painted Interior Panels


Moe, Larry, and Curly
John Branchaw did his magic today painting the interior parts.  Philip and I served as meager apprentices.  We started the long day around noon working on parts prep and wrapped up the clear coat by ten pm.

First step was to finish scuffing all the remaining parts, filling in fiberglass chips on the seat back, and placing all panels on racks for painting.  As is always the case with painting, the prep work took about 80% of the time.  Once all the parts were suspended from the paint racks or placed on the paint table we did a final cleaning with wax & grease remover.

Philip scuffing the seat back for primer.

Prep work completed, we began the painting.  First a good coat of epoxy primer, then panted the Chrysler CDM Mineral Gray Metallic paint, and finally a couple of good passes with the clear coat.

Parts hung; Primer application.


Wrapping up the clear coat at 10:30pm.
The end result was fantastic.  The Mineral Gray Metallic seems to dynamically shift colors as ones angle changes.  The clear coat went on really smooth and glassy.  On Tuesday we'll stop in to the hangar to see how things are binding and run the buffer over the parts.

Sunday, June 10, 2012

Attached Wings for Alignment

Big day for the RV build.  With the help of a few fellow airport rats, we very carefully attached each wing by inserting the wing spars into the fuselage attach channel.  The fuselage was leveled along its longitudinal and lateral axis.    Wing sweep, dihedral, and incidence was meticulously measured and re-measured to ensure that the alignment was exact.


Once all measurements were verified we marked 5/8" distances from each edge of the rear wing attach point.  This determined the minimum distances from the hole center to each edge.  After the hole location was verified we step drilled #40, #30, and #19 holes for the AN3 attach bolt.

Task complete!

Thursday, June 7, 2012

Fuel Pump Bracket Mounts

Drilled holes in fuselage floor and installed attach point for the fuel pump bracket mounting screws. The fuel pump will be installed just behind the firewall on the left side floor.

Thursday, May 31, 2012

Engine Site Survey

Took a ride up to KFDK this afternoon with Mike Regen in his RV-6 to see the engine that will eventually make its way into the RV.  This is a gorgeous Superior IO-360 engine that was built by Mike Peters (KTM Mid Atlantic Engines) and has been preserved in his office for the past two years.  The engine has been bored, balanced, and has a custom paint job with lots of chrome (black cases/jugs, red sump/push rod tubes, polished stainless intakes).


Wednesday, May 30, 2012

Prep Interior Parts for Paint


John Branchaw and I spent a few hours this evening scuffing all fuselage interior parts and panels in preparation for paint.  We also sanded and finished the microballoon filler that was applied to the rivets on the instrument panel.

Next step is to build a rack for suspending all parts so that we can apply primer, paint, and clear coat.

Monday, May 28, 2012

Fabricated Spar Attach Angles


Fabricated two forward spar attach angles.  (one left, one right).  This is the angle that gets bolted to the fuselage and provides a 1" diameter hole for securing the wing bolts.

Thursday, May 24, 2012

Added instrument panel rear vertical rails

Added two instrument panel rails to run vertically along each inside edge of the panel rear.  These rails are used to support mounting the GTN750, PMA800, and SL40.  Added plate nuts to edges for attaching the avionics.  The panel rails were cut from 3/4" x 3/4" angle bracket.  Particular attention was paid to ensuring that the edges of the rails don't overlap the inside edge of the panel opening.

Wednesday, May 9, 2012

Canopy Cut - Final Fit

Finally finished cutting and trimming the canopy.  This too a lot longer than I expected.  Multiple cuts were made along the lower and leading edge of the canopy.  Each cut lowered the canopy a little more onto the canopy frame to the point where the canopy bottom butted up against the canopy frame rails with very little pressure.  The clamps attached in this picture serve more to hold the canopy in place than they do to press the canopy against the canopy frame.

Saturday, April 28, 2012

Painting Fuselage Interior

Spent the entire day painting the fuselage interior.  John Branchaw did an excellent job laying down the primer, base coat and clear coat.  The color we used was a Chrysler CDM Mineral Gray Metallic.  The intention was to use a color that wasn't too dark but blended well with the instrument panel avionics and switches.  The color came out great.  It pops well and color tones change based on the viewers angle.  That's exactly the effect we were looking for.

The clear coat that we used was Lusid Technologies BlackFire Ultra Euro Clear (BF210 Black Fire SRC).  The finish that this clear coat left was very smooth considering the fact that we painted at very acute angles.


Saturday, March 10, 2012

Drilled Holes for Main Gear Bolts


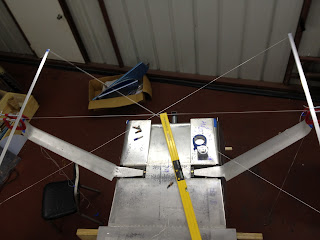
Tonight Mike Regen and I worked on aligning the landing gear and drilling the holes for main gear bolts.  This required a little creative thinking and dusting off of the cobwebs on geometry and the Pythagorean theorem. 


Two equilateral triangles formed by the string combined withe the parallel angle iron assured symmetry on the gear positioning.


We created a parallelogram with two pieces of angle iron clamped to each flat spot where each  axle mounts.  We then ran string from each forward end of the angle iron to the opposite side's angle iron rear end.  Once we had the two strings attached we could get the center point and equalize the length of each angular string.